Are you grappling with the frustration of 3D printing first layer ripples? You’re not alone. In this guide, we’re diving into a common challenge with a concise solution.
Think of the first layer as your print’s foundation – if flawed, the entire masterpiece wavers. Discover the causes behind those pesky ripples and unveil effective remedies. From troubleshooting steps to practical prevention, we’ve got you covered. Let’s turn those ripples into history and begin a smoother 3D printing journey together.
Understanding 3D printing First Layer Ripples
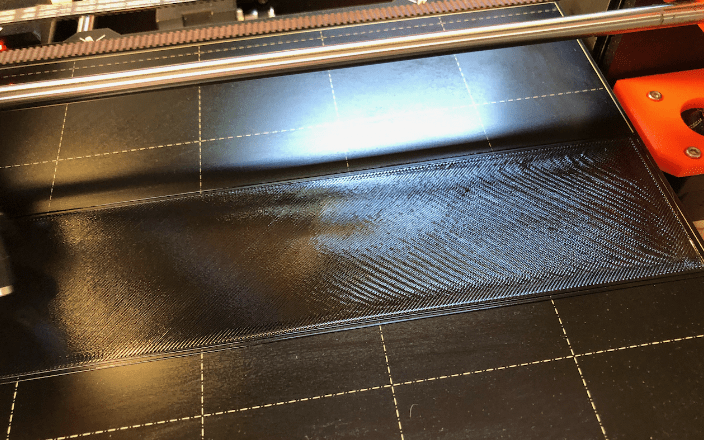
Regarding 3D printing, the first layer is like a canvas upon which your masterpiece takes form. However, sometimes, this canvas isn’t as smooth as we’d like it to be, resulting in what we call “first layer ripples.” These ripples manifest as subtle waves or uneven textures on the initial layer of your print, disrupting the precision you strive for.
First layer ripples, or “wave patterns,” occur due to initial deposition irregularities. Instead of a pristine and uniform surface, you might notice small ridges or undulations that compromise the print’s quality. While they might appear harmless, these ripples can cascade into larger issues as subsequent layers build upon them.
Causes of 3d printing First Layer Ripples

3D printing is a fusion of art and technology, but even the most innovative process encounters its share of challenges. First layer ripples, those pesky distortions that can mar your creations, often have identifiable causes. Let’s delve into the culprits behind these disruptions and suggest how to regain control.
1. Uneven Print Surface:
An unlevel print surface can spell trouble for your first layer. Even the tiniest incline or dip can lead to irregular material deposition, resulting in frustrating ripples. Ensure your print bed is impeccably level before embarking on any print job.
2. Incorrect Bed Leveling:
Proper bed leveling is a cornerstone of successful 3D printing. If your printer’s bed isn’t uniformly leveled, the nozzle might be too close or too far from the surface, causing inconsistencies in the first layer. Regularly calibrate your bed to avoid this issue.
3. Extruder Calibration Issues:
A misaligned or poorly calibrated extruder can wreak havoc on your prints. If the extruder isn’t delivering the right filament, it can lead to uneven material distribution and, subsequently, those unwelcome ripples.
4. Inconsistent Extrusion:
Irregular filament flow, often caused by partial clogs or inconsistent filament diameter, can contribute to first layer ripples. Ensure your extrusion system is in top-notch condition and your filament is high quality.
5. Print Speed and Temperature Imbalance:
Print speed and temperature settings are crucial in achieving a flawless first layer. Rapid printing or incorrect temperature settings can cause improper material bonding, leading to ripples.
By addressing these root causes, you’ll take significant strides toward achieving pristine first layers in your 3D prints.
Read: How to 3D Print Clay Cutters like a Pro
How to Fix 3d printing First Layer Ripples – Solutions
Conquering the realm of first layer ripples involves a blend of technique and precision. Fortunately, armed with the right strategies, you can transform those uneven surfaces into a smooth canvas for your creations. Let’s explore a step-by-step approach to address and rectify first layer ripples, ensuring your 3D prints start on the right foot.
1. Pre-Printing Checks:
- Proper Bed Cleaning and Adhesion: Ensure your print surface is clean and debris-free. Applying suitable adhesives like glue sticks or adhesive sheets can aid material adherence.
- Bed Leveling Techniques: Calibrate your print bed accurately. Use manual or automatic bed leveling methods to guarantee a level surface for your first layer.
2. Adjusting Print Settings:
- Optimal Print Speed and Temperature: Experiment with different print speeds and settings to find the sweet spot for your specific filament and model.
- Layer Height Adjustment: Fine-tune layer height settings to achieve optimal adhesion and even material deposition.
- Initial Layer Flow Rate Calibration: Adjust the flow rate to ensure the right amount of filament is extruded during the first layer.
3. Post-Printing Analysis:
- Identifying and Rectifying Ripples: Examine the printed first layer closely to identify any remaining ripples. If present, consider revisiting bed leveling, extrusion calibration, or print speed settings.
- Fine-Tuning Techniques for Subsequent Prints: Implement lessons learned from each print to continually improve your results. Keep a log of settings and adjustments for future reference.
Remember, troubleshooting first layer ripples requires patience and iteration. By meticulously refining each step in your printing process, you’ll be well on your way to achieving consistent, ripple-free prints.
Read: Cost to 3D Print a Phone Case
Preventing 3d printing First Layer Ripples: Best Practices
In the intricate world of 3D printing, prevention often trumps cure. Integrating smart practices into your printing routine can minimize the chances of encountering those pesky first layer ripples. Let’s explore a range of preventive measures that will pave the way for smoother and more successful 3D printing experiences.
1. Regular Maintenance Routine:
- Nozzle Cleaning: Keep your nozzle free from debris and filament buildup, ensuring consistent extrusion.
- Filament Path Inspection: Regularly check the filament path for any obstructions or tangles that might affect the extrusion process.
- Belt and Rod Lubrication: Ensure smooth printer movement by lubricating belts and rods per the manufacturer’s recommendations.
2. Filament Quality and Storage:
- Invest in Quality Filament: Opt for high-quality filaments that adhere to consistent diameter and material standards, reducing the chances of extrusion irregularities.
- Proper Filament Storage: Store filament in a cool, dry place with airtight containers or desiccant packs to prevent moisture absorption.
3. Software and Slicer Settings:
- Choose the Right Slicer Profile: Select or create slicing profiles tailored to your printer and filament type for optimal results.
- Use Supports Wisely: Employ support structures only where necessary to reduce the risk of overhang-related ripples.
4. Bed Surface Options and Treatments:
- Build Surface Selection: Experiment with different build surfaces such as glass, PEI sheets, or adhesive sheets to find the one that provides the best adhesion for your prints.
- Bed Surface Treatment: Applying a thin layer of hairspray, glue, or other adhesives can enhance bed adhesion and minimize the chances of ripples.
Integrating these preventive measures into your 3D printing routine sets the stage for successful prints from the very first layer.
Mastering the Art of Flawless 3D Printing
As we bid farewell to the world of first layer ripples, remember that 3D printing is an evolving journey. Armed with insights into the intricacies of the first layer, you’re now equipped to conquer challenges confidently. Every print is a canvas, and every ripple is a chance to refine your craft.
Whether you’re a seasoned creator or a curious beginner, the path to perfection is paved with experimentation and learning. Embrace the journey, celebrate each success, and approach each obstacle as an opportunity. With precision and persistence, you’re on your way to mastering the art of flawless 3D printing. Let your imagination run wild; your creations are a testament to your dedication. Happy printing!

